Sunday, December 16, 2012

Book Reviews: Life of Pi and The Lost Symbol


  1. Life of Pi: Story of survival in the pacific ocean of a boy, named Pi Patel, with a strange companion (a tiger, who was called Richard Parker). The story is being narrated by the man Pi Patel who lives in Canada and is being interviewed by the author (Yann Martel). The story starts from Pondicherry where the boy Pi and his brother live with their parents. Pi’s father runs a zoo in Pondicherry but during the country-wide emergency (as declared by the then Congress government led by Mrs. Indira Gandhi) the zoo was under pressure to become state-owned and so Pi’s father decides to immigrate to Canada and also sell his zoo animals to American and Canadian zoos. So Pi and his family board a Japanese ship to cross the pacific ocean and go to Canada. Just a few days into their journey there comes a storm while their ship is near the deepest part of the ocean and the ship was badly damaged and it sinks. Pi was put on a life boat on which there were a few others – all zoo animals – a hyena, a zebra and a tiger and they were soon joined by a orangutan. The author then recounts how the hunger makes the animals to kill the weaker among them and in the end only the boy (due to his intelligence) and the tiger (due to its strength) were the only once who survived on the boat. Then there are some interesting experiences that Pi has during his struggle for survival which is very well told by the author and keeps the reader engaged. I also watched the movie made on the book by Ang Lee (and is nominated for Best Picture in golden globe awards ceremony) and it was a beautiful movie which has made nice use of CGI wizardry to create the imaginary world of the story of Pi into a believable real-like experience which the kids are sure to get awe-inspired by. Overall a 4 star book ( I am reserving the one star as I have read one more very interesting story of survival called Papillon by Henry Charriere which to me was the best and Life of Pi being a short story in comparison does not surpass Papillon’s story).
  2. The Lost Symbol: This the most recent story of Robert Langdon (the Harward Symbologist) who is the hero of Dan Brown’s several other novels and falls short of being as interesting as the those other stories of Langdon (so I give it a 4 star) however its still a very readable story about the secret of ancient mysteries which are supposedly hidden in Washington D.C. As always, Dan Brown’s research on the background for the book pertaining to the Masonic heritage of some of the founding fathers of the country are thorough.
Sunday, November 04, 2012

Setting up wireless video surveillance with DVR

I setup video surveillance recently with the following gadgets:

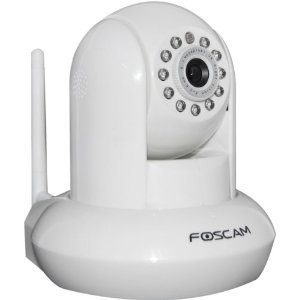
  • Foscam FI8910W Wireless/Wired Pan & Tilt IP/Network Camera with IR-Cut Filter for True Color Images - 8 Meter Night Vision and 3.6mm Lens (67° Viewing Angle) – White = $89

  • Uniden UDW20055 7” LCD Indoor/Outdoor Wireless Video System, Remote, 500ft Encrypted = $250 (however I got refurb one at $150) – it comes with 2 wireless cameras and 1 LCD monitor

It comes with a Uniden Surveillance System software that can do continuous video recording and save to disk (DVR function, of course, you will need to have a PC and spare storage space to save the recordings). You can time the recordings to delete after n number of days.

  • Foscam Pro: Two Way Audio and Recording, v2.0 App for iPhone ($6) – this enables discovering

One interesting experience I had was I learned the hard way that if your router is behind a VOIP phone adapter then port forwarding cannot work and I wasted quite sometime before I realized this fact and put the phone adapter (from Vonage) behind the router (so now modem line goes to router and then phone adapter connects to the router on one of its wired ports).

Saturday, October 27, 2012

Upgraded to Windows 8 Pro

Microsoft has taken a bold step towards removing the start menu from Windows 8. However that is not a big deal as it was made out to be by the media prior to the launch. The upgrade process from Windows 7 home premium to Windows 8 Pro for mere $40 was awesome. The upgrade goes through very smoothly and Windows 8 is quite fluid and fast. The metro look and feel is very effective and looks good. The tiles on the screen could be better utilized on a touch screen tablet or touch sensitive monitors. For a regular desktop use you may not feel much of a hassle in getting used to the tiled start screen. On the bottom left there is a tile to take you to desktop mode and that's it - ones there it is as usual. I used to use launchy (which continues to work even after the upgrade) for accessing any program in the start menu and rarely had the need to go to the start menu so for me it is much the same as before. So did you like Windows 8 Pro - feel free to leave your comments.

Tuesday, October 02, 2012

Installing VMware Tools on Ubuntu Guest OS

VMware Tools are binaries that are guest OS dependent and need to be installed on the VM after the guest OS has been installed. The tools are required to see the IP addresses assigned for the network interfaces of the VM (among other things).

Following are the steps:

  1. Power on the VM.
  2. Once the guest OS has booted up, go to the VM > Guest > Install/Upgrade VMware Tools menu.
  3. This will put the VMware Tools directory under /media directory in Ubuntu.
  4. cd /media/VMware Tools
  5. cp /media/VMware Tools/VMware*tar.gz /tmp
  6. cd /tmp
  7. tar xvzf VMware*.tar.gz
  8. cd vmware-tools-distrib/
  9. sudo ./vmware-install.pl
  10. When the installation scripts promps for answers, just hit Enter since defaults are OK.

The above is based on: http://www.ubuntugeek.com/how-to-install-vmware-tools-in-ubuntu-10-04-lucid-lynx.html

Me in Java One 2012 Video

We shot for this video during the Meetup at Oracle Santa Clara where we met James Gosling. I am seen at duration 0:49 sec of the video.

Monday, October 01, 2012

PRO pack development for SCOM + SCVMM 2012

Over and above what is found in the documentation Building PRO Pack for SC2012, we also need to set the following property of the PRO.Base class during the PRO target instance creation:

objInst.AddProperty("$MPElement[Name='PRO!Microsoft.SystemCenter.VirtualMachineManager.PRO.Base']/Name$", <target hostname>)

Only then will the PRO tips targeted to instances of the PRO target object be fetched into SCVMM 2012.

Also one important change in SC2012 is the MP Authoring toolkit has been replaced by Visual Studio 2010 Authoring Extensions for System Center 2012 – Operations Manager.

Thursday, September 20, 2012

Using IOMeter

Excerpted from http://4sysops.com/archives/iometer-measure-disk-performance/

The IOMeter tool can be used to test disk performance, IO transfer rate and IO response time. I used it to pump some traffic (read, write or both) in the network and measure the performance of the ports utilized and trigger threshold crossing events.

Some important points about using this tool are mentioned below:

1. Run this tool as an administrator user.

2. Select the disk targets which are generally in my case remote SAN/LAN disks presented to the host or VM on the hypervisor. You should specify the number of sectors Iometer can use for the performance test otherwise it will use all available disk space and if the disk is huge then the tool just appears to have stuck in “preparing disk”. So set the “Maximum Disk Size” to 1000 sectors as shown below.

iometer-sectors[1]

3. You should configure the “Access Specifications”. Any pre-configured specification (like “512B; 100% Read; 0% random”) can be used for basic traffic related tests.

4. Start the performance test by clicking the green flag button on the toolbar.

5. IOMeter will prompt for specifying the results.csv file where it will log the test results.

6. Now go to the “Result Display” tab as shown below to watch the result. You can set the update frequency to 3 or 5 secs to watch the updates in real time.

iometer-results[1]

7. To end the test, click the Stop button on the tool bar.

Wednesday, September 12, 2012

A simple chrome web app

To create a chrome web app follow the below steps:

1. Create a new folder.

2. Have an icon from findicons.com and save the icon (PNG format one in the above folder).

3. Create a new text file and copy paste the below (the below sample creates a chrome web app to launch this blog):

{
"name": "Watsh's Blog",
"version": "1.0",
"manifest_version": 2,
"description": "Launcher for Watsh Rajneesh's blog",
"icons": { "128": "gnome_blog.png" },
"app": {
"urls": [
"http://rwatsh.blogspot.com"
],
"launch": {
"web_url": "http://rwatsh.blogspot.com"
}
}
}


The highlighted parts above can be changed to create your own chrome web app.


4. Save the above file with the name “manifest.json” in the same folder we created above. The complete manifest file info is found here.


5. Now to install it in chrome browser, select the settings icon “wrench” on the top right hand corner of your chrome browser and select Tools > Settings > Extensions and check the “Develolper mode” check box. Then click on the “Load unpacked extension” and select the folder we created above which contains the icon and the manifest files.


6. That’s it. Your web app is installed and available in chrome.


The above tutorial is based on this nice tutorial. The only change I have done above is to port the manifest.json to comply with manifest file version 2.

Friday, August 24, 2012

Using NPIV port for RDM disk access in VMware vSphere

Following are the steps to create NPIV port on an adapter (only tested with Brocade HBAs) on a host with VMware vSphere ESX/ESXi hypervisor:
  1. Generate NPIV port(s) WWNs for VM
  2. Use the generated NPIV port WWN, the physical port WWN and the storage port WWN in one Zone (don’t put any other WWNs in the zone). There could be other zones in the final active zone config but the zone which is to let the vSphere create NPIV port should only have those 3 WWNs (physical port, NPIV port and storage port)
    • Note: It is important to note that for RDM access through NPIV port to work we also need to have the base port in the zone. We cannot remove the base port from the zone after the NPIV port is created. Doing so results in making the RDM disk inaccessible.
  3. Confirm that the SAN storage is visible in the Host > Configuration > Storage under Devices.
  4. Power off the VM.
  5. Add a hard disk to the VM (VM > Edit Settings > Add > Hard Disk). Choose the option “Raw Device Mappings” to create an RDM disk and select the SAN LUN. See this for step by step instructions on setting up an RDM disk for a VM.
  6. Now power ON the VM. When the VM is powered on at that time the hypervisor will know that there is an NPIV port generated for the VM and it could be used to see the same disk which is presented to the VM though a physical port currently. So it will create an NPIV port under the physical port and thus the RDM SAN disk will continue to be accessible from the NPIV port.
  7. To confirm if the NPIV port is really created, check through the SAN fabric manager if the fabric shows the new NPIV port WWN as logged in to the same fabric port as the physical port.
  8. Also you can run some traffic in the VM on the RDM disk and check the stats on the NPIV port if they show the usage of the NPIV port. The stats on the NPIV port can be checked from CLI or management client for the adapter.

Wednesday, July 25, 2012

Agile Software Development Training

I recently attended a 2 days training on Agile methodologies for software development. Following are some of the salient points that i took a note of (may not be in order):

  • Agile software development emphasizes on more frequent releases (at least once per month). At the end of every sprint the product should be in releasable quality.
  • In order to keep the software in a release-ready state we need to build automated test suites and run the tests upon every check-in (continuous integration).
  • Plan only for short term (at max 2 sprint worth of duration) so that we can always re-prioritize the requirements (grooming the backlog) to accommodate any changes to the requirements.
  • We need to focus on driving down the fixed cost of development (like the cost to run the regression tests by running the regression tests through automated test suites) as much as possible.
  • Break down the dependencies on the hardware device by employing simulation tools or mock testing whenever cost to do so is acceptable.
  • To start with test automation, build a safety net of unit/acceptance tests around the legacy code.
  • TDD - Test driven development - emphasizes more rigorous unit testing (tests written prior to coding) - which makes it easy to catch regression issues from occurring going forward
  • Separate GUI event handler logic from the actionPerformed() method into a separate wrapper method which can be tested without invoking GUI.
  • Validations should be done on both client and server side preferably in common code being invoked from both client and server
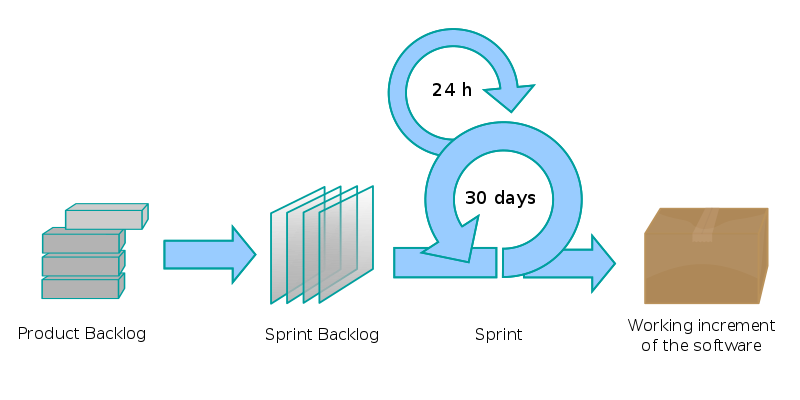
  • SCRUM - is an agile project management process as represented with the screenshot below:

    • Product Owner (not shown) - same as product management team
    • Product backlog - requirements gathered from customers or partners. It is comprised of Epics (a big story) or stories. A story is a requirement adding value by itself. 
    • A story can be split into one or more stories during the "User Story Workshop" meetings (similar to functional specification review meetings where development team, product management and testers meet to understand the requirements more clearly and the outcome of this meeting is: more new stories which can fed back to product backlog, acceptance tests document which is written to test all possible use cases and shared understanding between participants)
    • The length of a story should typically be small (roughly 2 days worth or so)
    • Multiple stories are then taken up in a sprint (roughly about a month long) phase in which those stories are implemented 
    • The progress of sprint is measured using a burndown chart (which is a chart of the work remaining to be done against time)
    • Size of team = 1 to 14 people
    • The team can be comprised of some developers who will write code and automated unit tests, testers who will create the acceptance test document and automate those acceptance tests and also do some exploratory testing towards the end of the sprint
    • A nice video of Ken Schwaber on SCRUM @ Google.
  • Tools:
    • Continuous integration : Hudson/ Cruise Control
    • Unit test: TestNG
    • Acceptance test: Squish/ QFTest
The above notes is mostly what i could glean from the training i attended though it may not still summarize the details well enough or may have captured some details inaccurately.

Friday, July 20, 2012

Meeting with James Gosling (father of Java)


(Myself with James Gosling)

(Having a beer at the event)

(James presenting his talk)

Yesterday (07/19/2012) i went to attend the “Bay area all JUG event at Oracle with James Gosling” where all the JUGs (Java User Groups) in the bay area had gathered for an evening of socializing and to hear to James Gosling speak at the Oracle campus in Santa Clara.


The evening started with a casual social gathering in the 4030 George Sellon Cir, Santa Clara, CA campus of Oracle (erstwhile Sun campus) where dinner was served and Java developers from all over bay area (around 200+) interacted with each other, talked about Java in general, heard James talking about his work in Liquid Robotics or posed for a Java Music Video which was in the making on site. The camper chairs with Java logo on them were souvenirs which people were asked to take with them if they wanted to – so almost everyone promptly got up from their chairs and folded them and put them in their cars :) – this was funny but i too picked mine – it was souvenir after all.


Then we went into the hall where the presentations were held. There were 2 presentations:


This presentation was on running Java SE embedded on Raspberry Pi (a small form factor computer, which can run Linux off of a SD card, has 126MB/256MB RAM, ARM7 processor and HDMI, USB, RJ45 slots). A demo was show of a small Java web server running on the RPi device which was serving the system information.

  • "Robots and Oceans and Whales, Oh My!" by James Gosling

This presentation by James Gosling was about the Wave Glider robot of Liquid Robotics company which is an unmanned maritime vehicle (UMV) that uses the up and down wave motion in the ocean to move forward. It is designed to support variety of sensors on-board. It can either be stationed at one place for say weather measurement or be mobile. It transmits data to shore stations via Iridium satellite communications. The satellite communication is very expensive ($1/1Kb of data) so the focus of James’ work is in optimizing the data communication between these nodes in the ocean and the shore stations. James showed the work he was doing using the NASA World Wind Java SDK to plot the path of these robotic nodes on the world globe (NASA world wind is a nice example of an advanced Java Swing application for displaying geographic data). He has built a JMS-ish style publish-subscribe asynchronous communication channel between the nodes which is also authenticated (using Open AM and Open DS directory service) so that only interested nodes which have subscribed for say data from the weather sensor and have successfully authenticated to the robot will be provided access to the data. The business model is less about selling the robots themselves and more about selling the data from the robots to the various interested parties (Commercial ships, Oil Rig etc).


In short, both the presentations were quite interesting to me and i ended up buying the Raspberry Pi kit to get my feet wet in Java SE embedded programming.

Monday, June 18, 2012

Eclipse cut, copy & paste key bindings not working

The key bindings for cut/copy and paste did not always work in Eclipse Java editor in my Eclipse Indigo installation.

The fix for this was to go to Window > Preferences > General > Keys and unbind the key bindings for Cut, Copy and Paste commands.

After this, it works fine.

I found this solution mentioned in https://bugs.eclipse.org/bugs/show_bug.cgi?id=368354.

Wednesday, April 11, 2012

vCenter Inventory Service Tune Up

I noticed that the wrapper.log file (typically found in C:/ProgramData/VMware/Infrastructure/Inventory Service/Logs/wrapper.log) for the VMware Inventory Service (which gets installed with the vCenter server) can keep growing by default and so if you are not interested in wrapper.log file to keep growing forever and thus impacting eventually the vCenter server itself (since it will fill up the entire disk space) then change the wrapper.conf to have a rolling file instead of a growing log file.

#********************************************************************
# Wrapper Logging Properties
#********************************************************************


# Log file to use for wrapper output logging.
wrapper.logfile=C:/ProgramData/VMware/Infrastructure/Inventory Service/Logs/wrapper.log

# Format of output for the log file. (See docs for formats)
wrapper.logfile.format=LPTM

# Log Level for log file output. (See docs for log levels)
wrapper.logfile.loglevel=INFO

# Maximum size that the log file will be allowed to grow to before
# the log is rolled. Size is specified in bytes. The default value
# of 0, disables log rolling. May abbreviate with the 'k' (kb) or
# 'm' (mb) suffix. For example: 10m = 10 megabytes.
wrapper.logfile.maxsize=100m

# Maximum number of rolled log files which will be allowed before old
# files are deleted. The default value of 0 implies no limit.
wrapper.logfile.maxfiles=2


Wednesday, April 04, 2012

Resolution for “No buffer space available (maximum connections reached?): JVM_Bind” issue

I hit this issue recently which occurred on only one windows 7 host. The error was caused by this hard to guess reason (http://support.microsoft.com/kb/196271). The default number of ephemeral TCP ports is 5000. Sometimes this number may become less if the server has too many active client connections due to which the ephemeral TCP ports are all used up and in this case no more can be allocated to a new client connection request resulting in the below issue (for a Java application):
Caused by: java.net.SocketException: No buffer space available (maximum connections reached?): JVM_Bind
    at java.net.PlainSocketImpl.socketBind(Native Method)
    at java.net.PlainSocketImpl.bind(PlainSocketImpl.java:365)
    at java.net.Socket.bind(Socket.java:577)
    at com.sun.net.ssl.internal.ssl.BaseSSLSocketImpl.bind(BaseSSLSocketImpl.java:95)
    at com.sun.net.ssl.internal.ssl.SSLSocketImpl.bind(SSLSocketImpl.java:45)
    at com.sun.net.ssl.internal.ssl.SSLSocketImpl.<init>(SSLSocketImpl.java:399)
    at com.sun.net.ssl.internal.ssl.SSLSocketFactoryImpl.createSocket(SSLSocketFactoryImpl.java:123)
    at org.apache.commons.httpclient.contrib.ssl.EasySSLProtocolSocketFactory.createSocket(EasySSLProtocolSocketFactory.java:183)
    at org.apache.commons.httpclient.HttpConnection.open(HttpConnection.java:707)
    at org.apache.commons.httpclient.MultiThreadedHttpConnectionManager$HttpConnectionAdapter.open(MultiThreadedHttpConnectionManager.java:1361)
    at org.apache.commons.httpclient.HttpMethodDirector.executeWithRetry(HttpMethodDirector.java:387)
    at org.apache.commons.httpclient.HttpMethodDirector.executeMethod(HttpMethodDirector.java:171)
    at org.apache.commons.httpclient.HttpClient.executeMethod(HttpClient.java:397)


The resolution is to open the registry editor and locate the registry subkey: HKEY_LOCAL_MACHINE\SYSTEM\CurrentControlSet\Services\Tcpip\Parameters and add a new entry as shown below:

Value Name: MaxUserPort
Value Type: DWORD
Value data: 65534
That’s it! Thanks to Daniel Baktiar for his post.

Update 6/14/2012:
Microsoft has a hot fix to resolve this issue for Win2K8 R2 and Win7: http://support.microsoft.com/kb/2577795

Saturday, February 11, 2012

Clearcase code merge on Unix

Following are the steps to perform a merge from branch1 (for say release1.0) to branch 2 (for say release 2.0) in clearcase on a Linux system:
1. Create a view to branch 2 where you want to merge the code to and set to the view. Then launch clearcase merge manager GUI.
$ clearmrgman
2. The merge manager wizard will prompt for the following:
    • Step 1 - Specify the dynamic or path to snapshot view
    • Step 2 - Select the elements you want to consider for merge
    • Step 3 - Select where you want to merge from by branch name, label name or from another clearcase view.
    • Step 4 – merge options like:
      • auto merge for directories – default yes
      • auto merge files in the directories – default yes
      • follow VOB symbolic links – default no
3. Once the merge completes, if there are any merge errors requiring manual resolution then those files are shown and one by one you can resolve them.
4. Once the merge is completed, all files modified, added or unloaded due to merge are in checked out state and require check in. So check in the files.
For more details, please refer the following:

Tuesday, February 07, 2012

A clearcase pre-code delivery check script

The following script finds all hijacked or checked out files recursively in the directories starting from the current working directory and dumps the data in an output.txt file.
@echo off
set output=c:\output.txt
echo Pre Delivery script started @ %TIME%
if exist "%output%" del "%output%"
echo List of Hijacked files in %CD%.  >> "%output%"
echo _______________________ >> "%output%"
echo Finding hijacked files. Please wait...
cleartool ls -recurse | findstr "hijacked" >>c:\output.txt
echo List of View Private files in %CD%. >> "%output%"
echo Finding view private files. Please wait...
echo ___________________________ >> "%output%"
cleartool ls -r -s -view_only| findstr /V ".contrib \\dist\\ \\build\\ dist .keep .class" >> "%output%"
start notepad "%output%"
echo Pre Delivery script completed  @ %TIME%. Please refer c:\output.txt file for hijacked and view private files

Wednesday, February 01, 2012

Converting from RHEL 6 to Centos 6.2

I recently installed RHEL 6 (workstation) but had not yet purchased an RedHat Network subscription when i learned that i can change it to Centos very easily and then updates will work off of Centos repository. So i upgraded RHEL 6 to Centos 6.2 with the following commands executed in order:


yum clean all
mkdir ~/centos
cd ~/centos
wget http://mirror.centos.org/centos/6.2/os/x86_64/RPM-GPG-KEY-CentOS-6
wget http://mirror.centos.org/centos/6.2/os/x86_64/Packages/centos-release-6-2.el6.centos.7.x86_64.rpm
wget http://mirror.centos.org/centos/6.2/os/x86_64/Packages/yum-3.2.29-22.el6.centos.noarch.rpm
wget http://mirror.centos.org/centos/6.2/os/x86_64/Packages/yum-utils-1.1.30-10.el6.noarch.rpm
wget http://mirror.centos.org/centos/6.2/os/x86_64/Packages/yum-plugin-fastestmirror-1.1.30-10.el6.noarch.rpm
rpm --import RPM-GPG-KEY-CentOS-6
rpm -e --nodeps redhat-release-server
rpm -e yum-rhn-plugin rhn-check rhnsd rhn-gnome-setup rhn-setup
rpm -Uhv --force *.rpm
yum upgrade
reboot
 This above is based on http://yo61.com/upgrading-rhel-6-2-to-centos-6-2.html blog post.

Wednesday, January 04, 2012

foobar2000 - A pretty nice music player for windows

foobar2000: I discovered today foobar2000 and have used it for almost the whole day today and i must say that its very light and fast (you really can feel it is so). Highly recommended - go check it out.


Tuesday, January 03, 2012

Batch script to change Java Home between different JDKs

I recently happened to be working on multiple releases with some of them requiring the code to be compiled with JDK 6 whereas the more recent releases requiring code to compile with JDK 7. So i wrote up the following batch script to make the job of switching between the 2 JDKs easier. Before i run my ant build script i run the below script to set to ‘7’ for JDK 7 or ‘6’ for JDK 6.

@ECHO OFF
echo %1%
 
if "%1"== "" ( 
    echo "Syntax: javahome 7 or 6" 
    Goto :end
) 
if "%1" == "7" (
    echo "Setting JDK 7"
    
    set JAVA_HOME=C:\Program Files\Java\jdk1.7.0_01
    GOTO :printver
) 
 
if "%1" == "6" (
    echo "Setting JDK 6"
    
    set JAVA_HOME=C:\Program Files\Java\jdk1.6.0_23
    GOTO :printver
)
 
:printver
echo %JAVA_HOME%
 
set NEW_PATH=%PATH%
FOR /F "delims=;" %%P IN ("%PATH%") DO (
    @ECHO path = %%~P
 
)
 
 
set PATH=%JAVA_HOME%\bin;%NEW_PATH%
echo %PATH%
 
java -version
:end

Book Review: Spring Start Here: Learn what you need and learn it well

  Spring Start Here: Learn what you need and learn it well by Laurentiu Spilca My rating: 5 of 5 stars This is an excellent book on gett...